Most sewing machines follow similar threading principles, even though the exact thread path may vary by model. Learning the basics of upper threading, bobbin placement, presser foot position, and tension can prevent many of the most common beginner sewing problems. This guide covers universal threading concepts for sewing and quilting machines while helping you understand where to find manuals, troubleshooting help, and beginner-friendly sewing supplies.
Understanding Needle Thread Direction
Many modern home sewing machines thread the needle from front to back, but not all machines use the same threading direction. Some vintage machines thread from left to right, or right to left depending on the machine design.
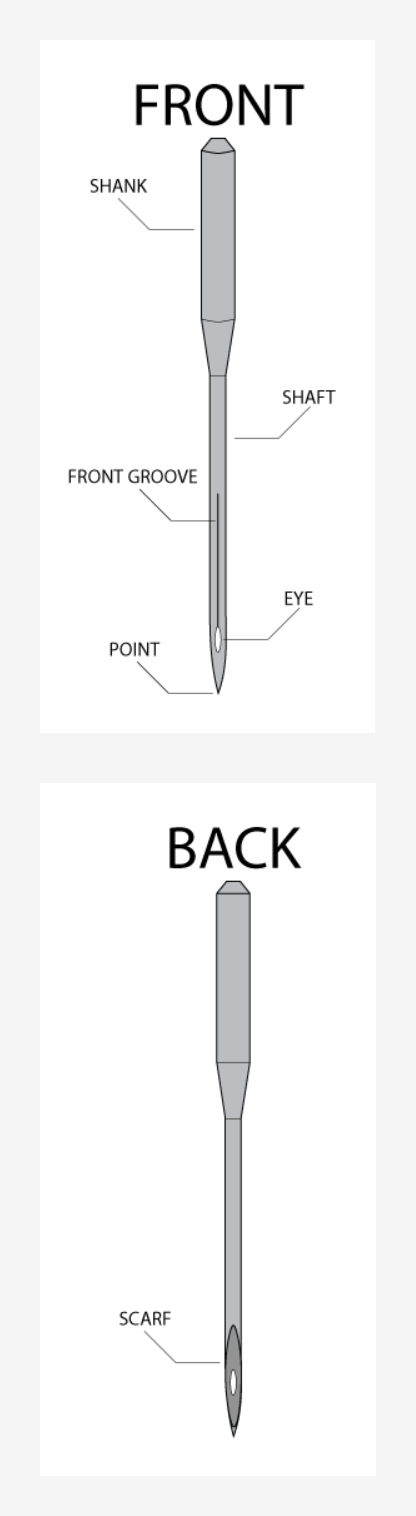
The “front” of the needle will have a long groove down the shaft of the needle that the thread lays into while it pierces the fabric. The thread enters the needle from this front side and passes to the back of the needle.
Needle installation direction is determined by how the needle interacts with the machine’s hook system. The scarf of the needle should be oriented so the point of the hook passes through it. Some high-speed straight stitch machines and many vintage machines use sideways needle positioning instead of the front-to-back style common on modern machines.
If there is any doubt on installation direction, or the machine repeatedly skips stitches after threading, double-check the correct needle orientation direction in your machine manual before continuing to sew.
Needle Anatomy
The front of your needle is rounded at the top, while the back is flat. This is to make sure your needle is seated correctly in your machine. The purpose each part serves is obvious in some cases and less obvious in others; regardless, let’s go over each part:
Shank – this is the part that is inserted into your machine.
Shaft – the thickness of this part determines needle size.
Front Groove – this is a long indention on the front of your needle that ensures a smooth stitch by guiding your thread into the eye.
Scarf (on the back) – this is an indentation at the back of your needle that helps your bobbin hook loop thread. A longer shaft prevents skipped stitches.
Eye – the part of your needle that thread passes through. Your needle type determines the size and shape of the eye.
Point – the part of your needle that passes through the fabric to pass thread to the bobbin hook and form your stitch. It is important not to use needles that have a bent or scratched point as this will affect the quality of your sewing (and directly impact your frustration level!).
Understanding The Upper Thread Path
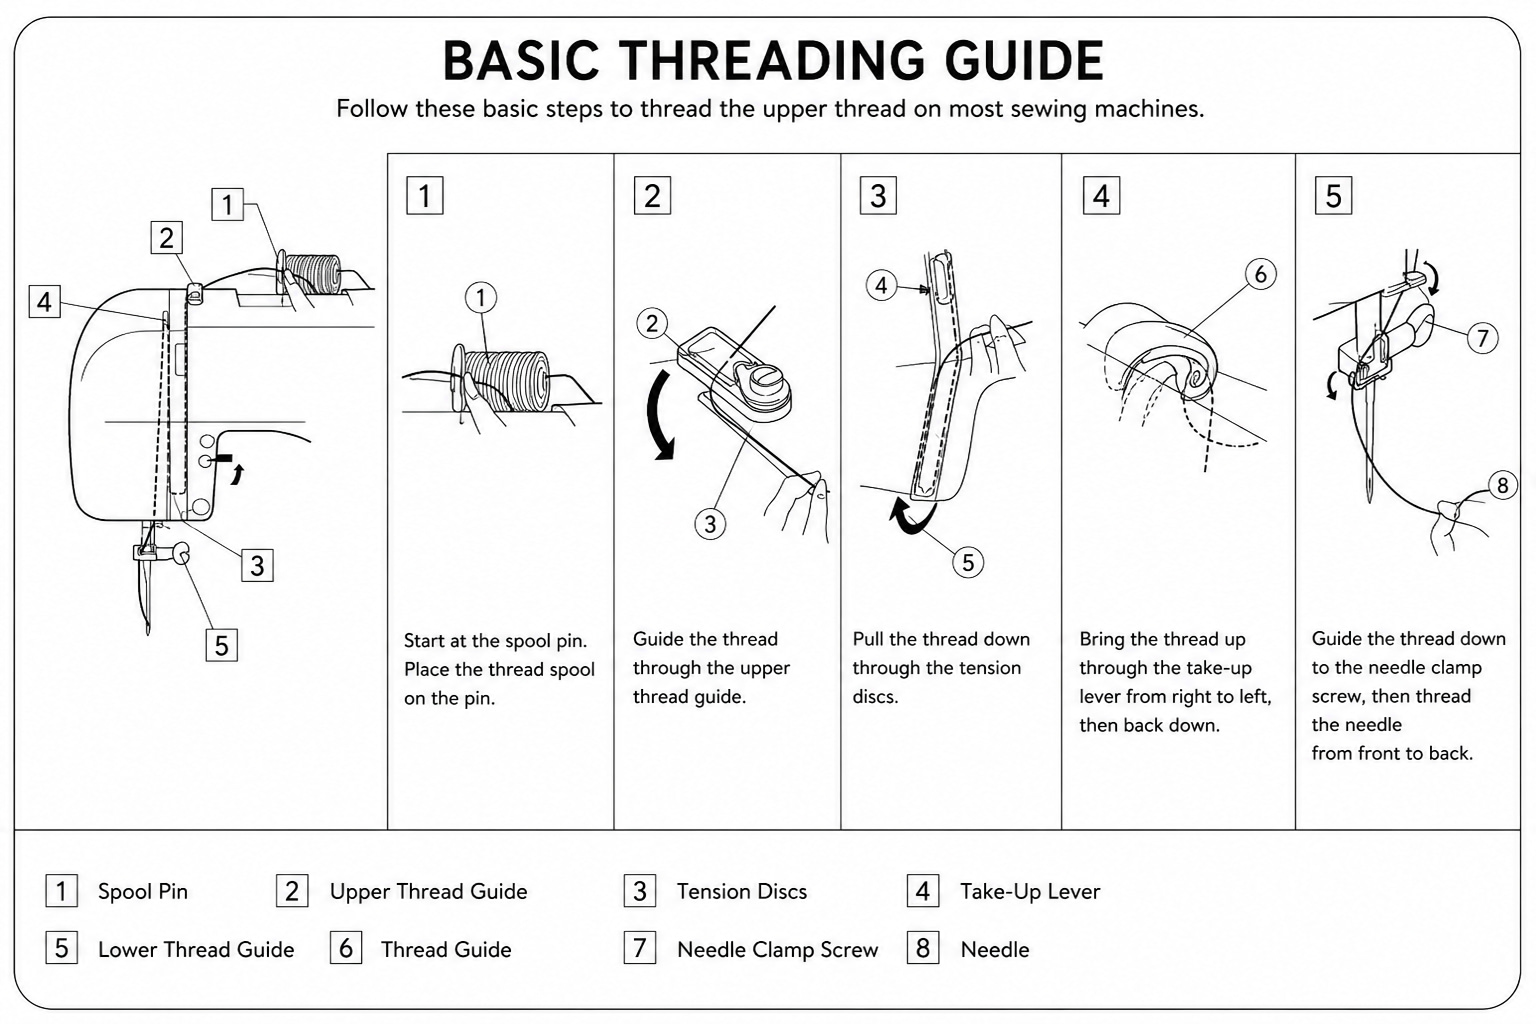
Most sewing machines guide the thread from the spool, through one or more thread guides, into the tension area, through the take-up lever, and finally down to the needle. The exact path changes from machine to machine, but the purpose is usually the same: control the thread so the machine can form consistent stitches.
If your machine suddenly starts looping thread underneath the fabric, skipping stitches, or breaking thread, the first step is almost always to completely re-thread the upper thread path.
Why Presser Foot Position Matters
Always raise the presser foot before threading the upper thread. On most machines, raising the presser foot opens the tension discs so the thread can seat correctly.
If you thread the machine with the presser foot down, the thread may sit outside the tension discs. This can cause loose loops, thread nests underneath the fabric, tension problems, or thread jams.
Beginner Tip
When in doubt, take the thread completely out of the machine and re-thread it from the beginning with the presser foot raised. Always cut the thread at the spool pin and pull the thread through from the needle side. This helps prevent pulling lint backwards into the tension assembly.
Why Spool Pin Position Matters
The way thread comes off the spool can affect how smoothly your machine sews. Some thread spools are designed to unwind from the side, while others feed better from the top. If the thread twists, catches, loops, or feeds unevenly, the spool position may be part of the problem.
Many modern machines use horizontal spool pins with a spool cap. Many vintage machines use vertical spool pins. Neither style is automatically better, but the thread, spool shape, and machine design need to work together.
If your thread seems to bounce, twist, or pull unevenly, try checking the spool cap, or using a separate thread stand. This is especially helpful when using large cones, cross-wound thread, slippery specialty thread, or modern thread on an older machine.
Why Needle Type Matters
The needle is part of the threading system too. Different needles are designed for different fabrics, threads, and sewing jobs. Using the wrong needle can cause skipped stitches, thread breaks, fabric damage, or poor stitch quality.
- Universal needles work for many general sewing projects
- Quilting needles are designed for layered cotton fabrics and batting
- Ballpoint or stretch needles help prevent damage to knit fabrics
- Embroidery needles help protect decorative embroidery thread
- Topstitch needles have larger eyes for heavier thread
If your machine is threaded correctly but still skips stitches or breaks thread, changing to a fresh needle in the correct type and size is one of the easiest things to try.
Using Built-In Needle Threaders
Many modern sewing machines include a built-in needle threader to help guide thread through the eye of the needle. These systems vary by machine model and often require the needle to be installed correctly and fully raised before use.
If the needle threader does not line up correctly:
- confirm the needle is fully inserted
- make sure the needle is not bent
- verify the correct needle system is installed
- raise the needle to its highest position
Many entry level, vintage machines and industrial machines will not include a built-in needle threader.
Bobbin Basics For Beginners
Your machine may use a top-loading bobbin, a front-loading bobbin case, or another bobbin system depending on the model. Bobbin direction matters. If the bobbin is inserted backwards, the machine may still sew, but the stitch quality can suffer.
Use a high quality bobbin in the correct style recommended for your machine and make sure the bobbin is wound smoothly. Uneven winding, damaged bobbins, or the wrong bobbin type can cause noise, skipped stitches, poor tension, and thread nesting underneath the fabric.
Common Beginner Threading Mistakes
Many sewing problems that seem serious are caused by small threading mistakes. Before adjusting tension or assuming the machine needs repair, check these basics first.
- Threading the machine with the presser foot down
- Missing the take-up lever
- Skipping a thread guide
- Using an old, bent, or dull needle
- Using the wrong needle type for the fabric or thread
- Using poor-quality or old thread
- Using the wrong spool cap or spool position
- Putting the bobbin in the wrong direction
- Using the wrong bobbin style for the machine
- Using a low quality replacement bobbin
Common Symptoms And What They Usually Mean
These are not the only possible causes, but they are common places to start before assuming the machine needs repair.
| Problem | Common Cause |
|---|---|
| Thread loops underneath the fabric | Upper thread may not be seated in the tension discs |
| Thread breaks repeatedly | Damaged needle, poor thread, wrong needle size, or threading issue |
| Skipped stitches | Old needle, bent needle, or wrong needle type |
| Machine jams right away | Needle may be inserted incorrectly or the machine may be mis-threaded |
| Uneven stitches | Old needle, incorrect threading, poor thread, or bobbin issue |
Finding The Correct Machine Manual
This guide covers general threading concepts, but your machine manual is still the best source for the exact threading path, bobbin direction, needle system, and maintenance instructions for your specific model.
If you are working with an older machine, inherited machine, or secondhand machine, finding the correct manual can make learning much easier. Millard Sewing Center offers many machine manuals and can help point you toward the right information when available.
Need Your Exact Threading Path?
If your machine is still giving you trouble after re-threading, check your manual or contact us with your machine make and model, or book a Learn Your Sewing Machine Class. Many threading and tension issues can be solved once the correct threading path, bobbin type, needle, and thread delivery are confirmed.
Helpful Supplies For Easier Threading
Good thread, fresh needles, and a few basic sewing tools can make threading and troubleshooting much easier. Beginners often have better results when they replace old thread, change the needle regularly, and keep small tools nearby for cleaning and handling thread.
- Quality sewing thread
- Fresh sewing machine needles
- Correct bobbins for your machine
- Small scissors or thread snips
- Tweezers for tight threading areas
- A machine manual for your specific model